spinSTER
Light-based tomography for 3D scanning

For my compSci group project, we recreated the "spinDude", a scanner that uses the shadows cast by objects to reconstruct their shape (a process called tomography). (This was a copy of someone else's project, but they have to be sure that the group projects will work!)
It only has 16 sensors, only produces 2D scans and only takes a single slice through the subject. The scans it produced were low-res and ugly.
However the method used has real potential, if only we had lots of sensors, at varying heights, and could sample them all at once. But where would we get something like that?
Digital Cameras
Digital cameras have thousands of sensors, and can take a 2d 'projection' in a single frame. If we use a 'blue-screen' style background, we can send thousands of 'light beams' past the subject where spinDude sends 16. We can get high quality 3D scans of convex objects with the same tomography algorithm as spinDude.
The software is not complex
It took a single evening to write version 0.1, most of which was spent fighting with swing, finding out that Java3D is only available for windows & solaris and getting confused about trig functions. The actual tomography algorithm is about 10 to 20 lines of code.
Since then, I have spent some time writing a model viewer that can directly display the voxel based output without converting it to a polygon based model.
Things we might have done if this were a group project
My implementation is unpolished and has much room for improvement. If we had a group working on this, we could have (among other things):
- made a turntable, or hooked a camera up to the turntable on spindude. At the moment the camera doesn't quite point at the same place for each picture
- arranged for the camera to take pictures under software control and for the pictures to be passed to the program automatically
- perhaps set things up so the camera records continuously as the platform turns without stopping, and the processing is started in a separate thread. Perhaps a system that does this could get a result out in the time it takes the turntable to do a complete revolution
- made a real-time 3d viewer to replace the voxel renderer that can take as much as a minute to render a single 400px frame
- written lots of thrilling documentation
Anyway, enough of my ramble, let's see the goods:
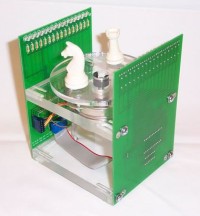
spinSTER v0.1

The rig (camera not shown, for obvious reasons).
All we need is a background that's easily distinguishable from the subject, a turntable that can stop at known angles and a camera. The turntable has a pin through the centre into the cardboard (and into the carpet!), and is marked at 30 degree intervals.
It is surprisingly hard to find the centre of a plastic disc. Despite three years of being a Maths student, this was the first time I used the compass and ruler Tom gave me in the first year.

A sample photo from the system
This photo was used in the example below. The images have been scaled down from the camera's full resolution to speed processing and smooth noise.

Background detection
I used a hue matching test to determine which pixels were background. I don't know if this is the best way, but it seemed to work all right.

The penguin in model viewer 1
This 3D model has 1,000,000 3-pixels and took 29 seconds on my PC to construct from 12 images, each of 256x192 pixels. (Using unoptimised Java code.)
Shown on the left is a screen-grab of the first model viewer. The slider on the right controls the z-axis, the image on the left shows a 2d slice through the model. The bottom third or so is junk corresponding to the picture below the bluescreen.
I am quite surprised as to how well this has worked. You can see the curve in the penguin's back, and the flat area where the corkscrew is recessed. The camera was not centred, and wasn't in exactly the same place between photos, but it still worked!
Rendering voxels
Not satisfied with the flat model viewer shown above, I wanted to render the model in 3D. It is easy (although computationally expensive) to ray-trace from the camera location to the model and detect whether or not to draw a voxel in each pixel of the rendered image, but what colour should you draw?
In order to shade the image, we need to know the normal vector to the surface. We can compute this by taking the difference between the position of the centre of gravity of all the voxels in the surrounding area and the position of the voxel itself.

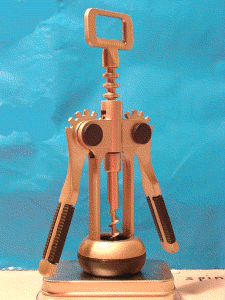
A bottle opener in model viewer 2
This sequence is rendered using the one step raytracing and centre-of-gravity normal estimation as described above. Rendering all 360 frames (400 px each) took 3.2 hours on my Athlon "1800+" (1533 MHz).
The source images for this model had to be realigned and touched up by hand because the camera moved noticeably between shots (largely due, I think, to the movement of me pressing the button). You can see them here.
The 3D model has not been touched up, so you can still see floating blobs where parts of the model did not appear as background in any photo, and grooves in the base from where the background was lower in some pictures than others.

Return of the penguin
This is the penguin model shown above, re-rendered with the voxel engine. It took more than 4 hours to render this gif!